Showing posts with label DIY. Show all posts

Monday, September 23, 2013

Strut Your Mutt: Bow Tie DIY

Last weekend we had the pleasure of participating in the Strut Your Mutt event hosted by Best Friends Animal Society. At our table our lovely BC ladies had a fun DIY set up for all ages: bow ties! These bow ties were so versatile that they doubled as hair bows, bow ties, and of course collar bow ties for our wonderful pup friends. 

Today we wanted to share how to make some bow ties for all who couldn't make it out to the event.


You'll need: 
1. 4" x 9" cut of your chosen fabric
2. 1.5" x 2.5" cut of the same fabric (or a different pattern for contrast)
3. Thin elastic band 
4. Metal hair clips
5. Needle 
6. Scissors
7. Thread of any color

How cute are these animal inspired swatches!

Step 1: Place your 4" x 9" piece pattern side down. Fold the top over till it reaches the middle of the swatch.


Step 2: Fold the bottom over to reach the middle (it can overlap the top fold a little bit). Next fold the right side over to meet the middle, continue this with the left side. 


* Your bow should now look like this with both sides folded towards the middle.

Step 3: Prep your needle and thread through about 10" of thread. Make sure to knot the end!

Step 4: Pinch the bow from the top and bottom towards the middle to create your bow shape

Step 5: Sew straight through the center of your bow, make sure to get all the folds you've created. After a few times through the center, knot off your thread and snip off the excess. 


Step 6: Our next step is a repeat of our first few steps, this time we'll be applying the same folds to our smaller 1.5" x 2.5" swatch. Place the fabric, swatch side down and fold both top and bottom towards the middle. Instead of folding towards the middle, now fold the swatch into a loop. Sew the ends of the swatch to keep the loop together.

Step 7: Take your bow and scrunch one end to fit through your newly made loop. Wiggle it towards the middle and tada, your bow is made!

Step 8: These are a few options for your newly made bows. One option is to use the elastic band to create a second loop. This loop size can be adjusted to fit depending on your pups collar thickness. Secondly a hair clip can be clipped through the back loop of the bow to create a hair bow. 

Step 9: Enjoy your new bow!

Hopefully you enjoyed our crafts-for-a-cause DIY. We'd love to see your bows if you make them! Post to Twitter or Instagram and use the hashtag  #bclovesmutts. 

Monday, July 2, 2012

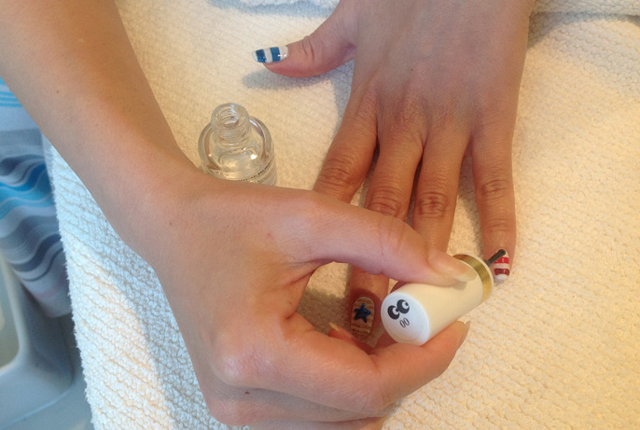
DIY: Fourth of July Inspired Nail Art

Fourth of July is the holiday for BBQ fiends and pool party fanatics, for family recipe cook-offs and debuting your brand-new bikini (and slimmed-down bikini bod). Given that most of us will only be wearing probably one or two articles of clothing max this Wednesday, your nails can play as your standout accoutrement. Our friends at Teen Vogue shared some of their patriotic-inspired tips to show off our red, white and blue.

{the finished look}


{step one: apply your base}


{step two: add stripes}


{step three: add glitter}

{step four: draw a star}

{step five: use a top coat}


***All photos: courtesy of Mars the Salon

Thursday, June 7, 2012

DIY: Strawberry Cocktail Popsicles

My immediate urge is to be terribly retro and attempt at using Nelly's, "Hot in Here" as my blind lead. So without shame and with pride for my early musical nostalgia, I say it is indeed hot in here, and what better way to welcome the season than with a refreshing popsicle. 


I have a love hate relationship with the sun and I'm confident those feelings are mutual. One thing we agree on is celebrating the season of tasty popsicles. The kind you think about for a good ten minutes after you're left staring at the stick. 


Thanks to our friend Emma Chapman, who is a contributing writer at A Beautiful Mess, for her recipe inspiration. We owe you a few mouth-watering popsicles for this gem. 


Strawberry Cocktail Popsicles, makes 4-5
Needed: 1/2 cup sugar, 1/3 water, 2 1/2 cups strawberries, juice from half a lemon, 1 tablespoon Angostura bitters. *note: bitters do contain alcohol, but only a small amount. 
In a small pot combine the sugar and water. Simmer over medium heat and stir until sugar fully dissolves. Remove from heat and allow this to cool as you finely chop up the strawberries. Stir in strawberries, lemon juice and bitters. Pour into Popsicle containers and freeze overnight. 


Monday, June 4, 2012

Summer DIY: Galaxy print tee

We've got a new addition to our DIY blog roll. Amanda of One of Each writes about fashion, interior design, art, and pretty much everything else interesting and visual, but what we really love are her DIY ideas. Case in point, this galaxy print crop top inspired by Christopher Kane. All you need is a plain tee, some bleach and a blow dryer. We can't wait to try this one out. See the whole step by step process right here.


(images from One of Each)


(original inspiration from Christopher Kane)


Monday, April 2, 2012

Meet Ki Nassauer.


We found this amazing pic of DIY vintage luggage shelving and decided we needed to find who thought of this and what their story was. 

Meet Ki Nassauer, a self proclaimed “Martha Stewart of junk.” She has made her living sifting, creating and displaying her wares and has collected a loyal following along the way. We now consider ourselves members of her community. 

You can find her musings as Editor and Chief of Flea Market Style Magazine, as a partner with Etsy in launching Junk Bonanza and as curator of Junk Revolution blog. 

So many ideas, so little time.


Wednesday, March 28, 2012

Be your own Barista.


Why go to a coffee shop when you can make one at home?? 

We were looking for a yummy recipe to spice up our morning routine a bit and we stumbled upon this one for an ICED CARAMEL MOCHA FRAPPE (it deserves to be capitalized just on yummyness alone) on Pinterest. We realize we cannot have this treat of all treats every day but once a week seems pretty fair.

Anyone else want to dive in to this as much as we do?? 

How to instructions, courtesy of the Tasty Kitchen.

Tuesday, March 20, 2012

DIY - Paper Flowers


(Photography by Hilda Grahnat)


These are so cute!! We just love them and could think of a million ways to incorporate these into our lives. Home Decor, Party Favors, Friend pick me ups, Color therapy etc. etc. you get the point. Whatever or wherever you want these to go, the time for DIY is now!

We originally stumbled upon these over at MINT design blog but it originated over at 
OH HAPPY DAY. (of course it did because she's AMAZING)

Click here for instructions and let us know how it goes. 


Monday, March 5, 2012

Shoe Redo with Mark Montano: Floral Shoe Clip

As promised, here is a peek at one of the awesome shoe redo projects we learned from Mark Montano at our Etsy Craft Night. Shoe clips are a fun way to liven up a pair of basic flats or heels. Add a shoe clip and it's like having a brand new pair of shoes! This floral clip idea by Mark is just in time for spring, and you can make it in no time flat.


• 5 squares of scrap fabric of different colors and textures (we included tulle)

• fabric scissors

• needle and thread

• pins

• flower template (we used this rose template from Martha Stewart weddings)

• 2 clip-on earring backs


1. Layer fabric with tulle as the top and middle layer

2. Pin template to fabric

3. Cut fabric and unpin template

2. Fold rose in half and stitch together

5. Cut fabric and unpin template Fold rose in half and stitch together
6. Loop thread through earring Secure flower to earring clip


photography & tutorial by Michelle Mayer

Friday, March 2, 2012

SHOE REDO.

Last night we had such a fab time with our friends at ETSY and Mark Montano, crafting away in the open atrium of the Craft & Folk Art Museum.

People flocked to change up their shoes with paint, glitter, fabric and embellishments. Above are some snap shots of the evening. Did you join us in the fun?? 

Check back soon for some shoe-redesign DIY's.

Monday, October 24, 2011

our love affair continues

Our love affair with the turband continues, thanks to this video by LEAFtv.

Tuesday, October 11, 2011

D.I.Y. Goodness

Embroidery thread is pretty much our favorite craft supply around here. There's nothing you can't make with it: friendship bracelets, festive pots for your household plants, and now thanks to Katie of Lemon Jitters, hair combs! Check out her super easy tutorial for turning a drab drug store accessory into a one-of-a-kind beauty.

LinkWithin

Related Posts Plugin for WordPress, Blogger...